How-To Work Knit Stitches (k)
Knitting uses only two stitches - the knit stitch and the purl stitch. It is the variations and combinations of these two stitches that create all the different stitch patterns.
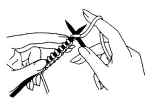 |
1. Cast on the desired number of stitches. Now, hold the needle with the stitches in your left hand, and insert the right needle into the front of the first stitch from right to left as shown in the diagram to the left. The yarn should be in back if your work. |
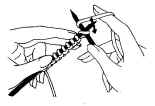 |
2. Wrap the yarn around the right needle from back to front, so that it rests between the two needles. |
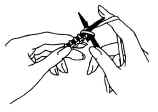  |
3. Slide the right needle down, then bring the point forward through the stitch, bringing the yarn with it. |
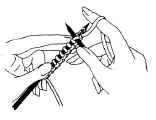 |
4. Slip the old stitch off the left needle. Be careful to slip only the one stitch that was worked off the left needle - do not allow the others to slip off. |
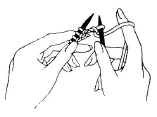 |
5. The new stitch is now on the right needle as shown in the diagram to the left. Repeat the above steps for each stitch on the left needle. Notice that at the beginning and end of each stitch, the yarn is at the back of the work. At the end of the row, all the new stitches will be on the right needle, and the left needle ill be empty. |
 |
Second and All Other Rows: Switch the needle with the new stitches over to your left hand. Put the empty needle into your right hand. Be sure to pull the yarn straight down at the beginning of the row. If it is pulled up and over the needle it will look like two stitches instead of one. Insert the needle into the first stitch as shown in the diagram to the left. Work each stitch in the row as before. Additional rows are worked in the same manner. |
How-To Work Purl Stitches (p)
A purl stitch looks just like the back of a knit stitch.
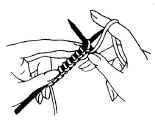 |
1. Cast on the desired number of stitches. Hold the needle with the cast on stitches in your left hand, making sure the yarn from the skein as at the right, in front of the needle. Insert the needle into the front of the stitch from right to left as shown in the diagram to the left. |
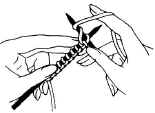 |
2. Wrap the yarn around the right needle as shown in the diagram to the left. The yarn will still be at the front of your work. |
 |
3. Slide the right needle down, then bring the tip from front to back through the stitch, bringing the yarn with it. |
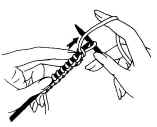 |
4. Slip the old stitch off the left needle. You now have a new stitch on the right needle. Continue purling across the row, following the above steps. Notice that at the beginning and end of each stitch, the yarn is at the front of your work. Second and All Other Rows: Work additional rows by switching the needle with the stitches to your left hand, then beginning to purl the new stitches. |
copyright © 1997 - 2024, Fiber Images™. ALL RIGHTS RESERVED.