Baby Bottle Warmer
Cut off the cuff of an old pair of sock of narrow about 4-6” from top, or desired length, and discard the foot part of the sock. Serger or zigzag around cut edge of cuff.
This pattern is copyrighted and printed with permission and may be used for your personal use only. It may not be copied or reproduced in any form, sold, or copied or posted to another web site. Fiber Images™ accepts no responsibility for the accuracy or correctness of any free patterns listed on this page.
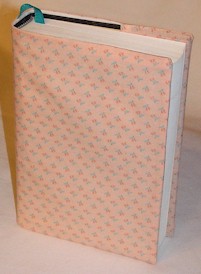
Fabric or Quilted Book or Notebook Cover
This easy-to-make book cover will add decorator touches to your cookbooks, favorite novels, or kid's school notebooks. When giving a book as a gift, a personalized cover will make your gift even more special.
Materials:
![]() outer fabric - the amount will vary according to the book size (see Step 1.) - Suggested Fabrics: lightweight upholstery or tapestry fabrics, quilted fabrics, cotton or cotton/polyester fabrics, patchwork-pieced fabric, embroidered counted cross stitch fabric
outer fabric - the amount will vary according to the book size (see Step 1.) - Suggested Fabrics: lightweight upholstery or tapestry fabrics, quilted fabrics, cotton or cotton/polyester fabrics, patchwork-pieced fabric, embroidered counted cross stitch fabric
![]() lining fabric - same size as the outer fabric
lining fabric - same size as the outer fabric
![]() ribbon for bookmark
ribbon for bookmark
![]() matching thread
matching thread
![]() 16" ribbon for handles (optional)
16" ribbon for handles (optional)
![]() decorations (optional)
decorations (optional)
Directions:
1. With a tape measure, measure the height and width of the book (with the book closed).
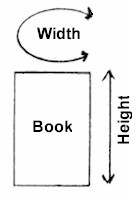
2. Take the height and width measurements from Step 1 and add 3/4" to each. Cut the outer fabric and lining fabric according to this measurement.
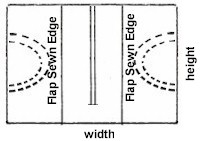
3. Cut two pieces of the outer fabric the height measurement plus 3/4" by 3" (these are the inner flaps).
4. Along the long edge of the flap pieces, turn back a 1/4" and stitch.
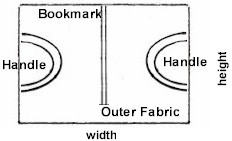
5. On the outer fabric piece, pin the bookmark in the center of one width side. If handles are desired, cut the ribbon in half. Center each handle and pin in place on each side, leaving 4" between the handles.
6. Place the flap pieces on top of the outer fabric/handles/bookmark piece, right sides together with the sewn edge toward the bookmark.
7. Place the lining fabric on top of the outer fabric/handles/bookmark/flaps piece right sides together. Sew a 1/4" seam allowance around the piece, leaving a 2 1/2" opening.
8. Turn the piece right sides out, stitch the 2 1/2" opening closed, and press.
9. Add any decorations as desired.
This pattern is copyrighted and printed with permission and may be used for your personal use only. It may not be copied or reproduced in any form, sold, or copied or posted to another web site. Fiber Images™ accepts no responsibility for the accuracy or correctness of any free patterns listed on this page.
Chair Leg Booties
Cut a piece of upholstery fabric, or any tightly woven heavyweight fabric, into a circle the size of the chair foot plus 3-4 inches. Cover the edge of the circle with quilt binding or folded wide bias tape, forming a casing. Insert thin elastic or ribbon through the casing. Place the chair foot in the center of the fabric circle and draw up the elastic or ribbon. Secure the elastic or ribbon. Optional: a small scrap of carpeting or quilt padding may be placed under the chair leg before the chair leg bootie is attached.
This pattern is copyrighted and printed with permission and may be used for your personal use only. It may not be copied or reproduced in any form, sold, or copied or posted to another web site. Fiber Images™ accepts no responsibility for the accuracy or correctness of any free patterns listed on this page.
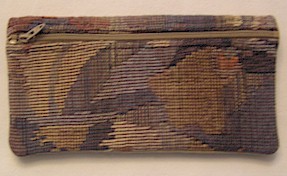
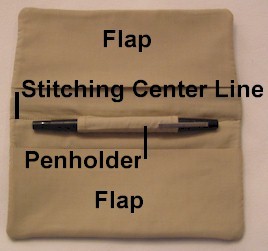
Checkbook Cover
This easy-to-make checkbook cover will organize your top-bound checks, check register, and hold a pen. The zippered pocket on the back provides a convenient place to hold your shopping list, credit card, etc. A Velcro™ closure is optional.
Materials:
![]() 1/4 yd (1/4 m) outer fabric (Suggested Fabrics: upholstery or tapestry fabrics, quilted fabrics, cotton or cotton/polyester fabrics, patchwork-pieced fabric)
1/4 yd (1/4 m) outer fabric (Suggested Fabrics: upholstery or tapestry fabrics, quilted fabrics, cotton or cotton/polyester fabrics, patchwork-pieced fabric)
![]() 1/4 yd (1/4 m) lining fabric (Suggested Fabrics: cotton or cotton/polyester)
1/4 yd (1/4 m) lining fabric (Suggested Fabrics: cotton or cotton/polyester)
![]() matching thread
matching thread
![]() 7" (17.8 cm) zipper
7" (17.8 cm) zipper
![]() ribbon and Velcro™ or snap for closure (optional)
ribbon and Velcro™ or snap for closure (optional)
Directions:
1. Cut one piece of outer fabric 7 1/4” x 3 1/2” (18.4 x 8.9 cm) and one piece 7 1/4" x 4 3/4" (18.4 x 12.1 cm) for the checkbook outer cover. Cut one piece of lining fabric 7 1/4” x 7 3/4” (18.4 x 19.7 cm). Cut two pieces of outer 7 1/4” x 3 1/4” (18.4 x 8.3 cm) for the inside flap pieces OR if the lining fabric is used for the flap pieces, cut two 7 1/4” x 6 1/2” (18.4 x 16.5 cm) pieces of lining. Cut one piece of lining 3" x 1 3/4" (7.6 x 4.5 cm) for the penholder.
2. On the 7 1/4” x 3 1/2” (18.4 x 8.9 cm) and 7 1/4" x 4 3/4" (18.4 x 12.1 cm) outer fabric pieces, turn down a 1/4" (.6 cm) seam allowance on each piece along the 7 1/4" (18.4 cm) edge.
3. Align the zipper 3/8" (1 cm) from the edge of each piece.
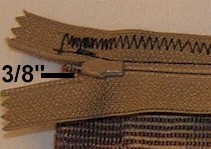
4. Stitch the zipper in place along the 1/4" (.6 cm) seam allowance on the 7 1/4” x 3 1/2” (18.4 x 8.9 cm) and 7 1/4” x 4 3/4” (18.4 x 12.1 cm) outer fabric pieces. Zigzag over the cut edges if required. Whip stitch a few stitches above the zipper head to hold the zipper tape together. The outer cover piece is completed.
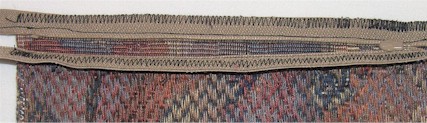
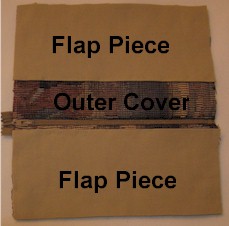
5. Make the inside flaps as follows. If the outer fabric is used, turn down and sew a 1/4" (.6 cm) seam allowance along the 7 1/4" (18.4 cm) side of each piece. If the lining fabric is used, fold each in half along the 6 1/2" (16.5 cm) side and press. If you use carbon-type check, cut the plastic flap out of your old checkbook and sew the plastic flap at the bottom edge (about 3/8" or 1 cm from edge) on one of the flaps along the 7 1/4" (18.4 cm) edge.
6. With the outer cover piece right side up, place the inside flap pieces at the top and bottom along the 7 1/4" (18.4 cm) sides, right sides together. Place the 7 1/4” x 7 3/4” (18.4 x 19.7 cm) lining piece on top, right side toward the outer cover. Open the zipper. Sew 1/4" (.6 cm) seam allowance around. Trim corners. Zigzag around edge if desired.
7. Turn the piece inside out through the zipper opening. Press.
8. Make the penholder by turning down both ends along the 1 3/4" (4.5 cm) sides and sew on the 3" x 1 3/4" (7.6 x 4.5 cm) piece. Fold the piece lengthwise along the 3" (7.6 cm) length, right sides together. Stitch along the 3" (7.6 cm) length 1/8" (.4 cm) from edge. Turn piece inside out and press seam line. With the lining side of the checkbook cover facing up, mark off the center between the two flap pieces. Align and center the penholder piece seam on this line. Stitch the centerline, catching the penholder edge.
9. Top stitch around the entire checkbook cover, 1/16" (.2 cm) from the edge.
10. Optional: Attach a ribbon and Velcro™ or snap for strap type closure.
11. Place your check register under one flap and your top-bound checks under the other flap.
This pattern is copyrighted and printed with permission and may be used for your personal use only. It may not be copied or reproduced in any form, sold, or copied or posted to another web site. Fiber Images™ accepts no responsibility for the accuracy or correctness of any free patterns listed on this page.
Cold Chaser Wrist Warmers
These easy to make wrist warmers fill the gap between the top of a glove or mitten and the sleeve cuff of a coat or jacket.
Cut off the cuff of an old pair of sock and discard the foot part of the sock. Serger or zigzag around cut edge of cuff. Cut a hole larger enough for thumb to fit through about 1” from the top of the cuff. Serge or zigzag around cut hole.
This pattern is copyrighted and printed with permission and may be used for your personal use only. It may not be copied or reproduced in any form, sold, or copied or posted to another web site. Fiber Images™ accepts no responsibility for the accuracy or correctness of any free patterns listed on this page.
Door Draft Dodger
A Door Draft Dodger or Door Snake is used to keep drafts from creeping into your house from under your doors. Place it on the floor and push it up against the door bottom. It is constructed of a tube of tightly woven fabric and filled with sand. The length is determined by your door width.
2 pieces tightly woven fabric 8” x door width + 6”, one outer cover, one lining
sand or cat litter
ribbon tie
Fold the lining fabric in half lengthwise and with small stitches seam along bottom and side. Stitches should be tight enough to keep sand from leaking out. Turn right sides out. Fill with sand. Over-filling may cause seams to burst. Sand should not be packed tight. It should make the draft dodger pliable and thick enough to fill the gap between the door and floor. Close and sew the open end closed.
Fold the outer cover fabric in half lengthwise, right sides together and seam along bottom and side. Turn right sides out. Turn down open end edge to the inside of the tube and top stitch. Place sand-filled lining piece into outer cover piece. Secure end with ribbon tie. Place under door.
This pattern is copyrighted and printed with permission and may be used for your personal use only. It may not be copied or reproduced in any form, sold, or copied or posted to another web site. Fiber Images™ accepts no responsibility for the accuracy or correctness of any free patterns listed on this page.
Glasses Case
Cut two pieces of fabric 6 3/4 ” x 6 3/4 ”. Cut a piece of thin quilt batting the same size. With right sides together and batting on top, stitch 1/4 ” seam along one edge. Open and fold pieces in half lengthwise, right sides together. Stitch 1/4 ” along long edge. Fold the lining fabric back over the case and batting, stitch 1/4 ” seam along bottom to close. Turn inside out. Stitch 1/4 ” from edge around top edge.
This pattern is copyrighted and printed with permission and may be used for your personal use only. It may not be copied or reproduced in any form, sold, or copied or posted to another web site. Fiber Images™ accepts no responsibility for the accuracy or correctness of any free patterns listed on this page.
Grocery Bag Holder
Hang this holder any convenient place in the kitchen to store and recycle plastic grocery bags. Simply place bags into the top and when needed, pull out from the bottom.
piece of fabric approx. 16” x 26” (a dishcloth may be substituted for the fabric)
10” – 12” elastic
ribbon for hanger
any desired decoration
Fold down 2” along 16” edges for hanger casing and elastic casing. If using fabric, turn down 1/4 ” along both 16” edges. Top stitch forming a casing or opening for ribbon or elastic. If using a dishtowel, turn down 2” along the 16” edges and top stitch forming the ribbon hanger and elastic casings. Insert elastic into one casing edge, gathering fabric as necessary, and secure at edges with stitches. Fold fabric or towel lengthwise, right sides together. Stitch 1/4 ” –1/2” seam along the long edge, stitching through elastic casing and stopping at the beginning of the ribbon casing. Turn right sides out and thread ribbon hanger through the appropriate casing. Secure ends of ribbon hanger with a knot or sew together. If hanging this bag over a doorknob, the ribbon hanger should be long enough to slip over the largest part of the knob plus 1-1/2”. Decorate or embellish as desired.
This pattern is copyrighted and printed with permission and may be used for your personal use only. It may not be copied or reproduced in any form, sold, or copied or posted to another web site. Fiber Images™ accepts no responsibility for the accuracy or correctness of any free patterns listed on this page.
Free Sewing Patterns and Projects - Travel Jewelry Case
![]() Sewing for Charity http://snugglesproject.org/ - Free Crochet, knitting, Quilting, and Sewing Patterns for Snuggles Projects - Create a security blanket for the innocent victims in animal shelters. The security blankets are called "Snuggles." Each animal would get a Snuggle to cuddle up with to feel warmth and comfort. Most shelter animals are kept in areas with stainless steel braces and hard plastic flooring or even bare concrete floors. The Snuggles would allow them to have a little reprieve from the coldness of the pen they are kept in. "Snuggles." not only give physical comfort but psychological comfort as well. And not only for the animals - the tens of thousands of kind-hearted people around the world who make them for the animals receive so much satisfaction from their work as well. Many have experienced the thrill of getting their friends, their family, their school or camp children, the elderly in their community involved in the Snuggles Project. The wonder of the Snuggles Project is how it bridges generation gaps and opens doors to community involvement.
Sewing for Charity http://snugglesproject.org/ - Free Crochet, knitting, Quilting, and Sewing Patterns for Snuggles Projects - Create a security blanket for the innocent victims in animal shelters. The security blankets are called "Snuggles." Each animal would get a Snuggle to cuddle up with to feel warmth and comfort. Most shelter animals are kept in areas with stainless steel braces and hard plastic flooring or even bare concrete floors. The Snuggles would allow them to have a little reprieve from the coldness of the pen they are kept in. "Snuggles." not only give physical comfort but psychological comfort as well. And not only for the animals - the tens of thousands of kind-hearted people around the world who make them for the animals receive so much satisfaction from their work as well. Many have experienced the thrill of getting their friends, their family, their school or camp children, the elderly in their community involved in the Snuggles Project. The wonder of the Snuggles Project is how it bridges generation gaps and opens doors to community involvement.