Booklet Pierced Earring Travel Case
Out of standard 7 bars per inch plastic canvas in the color of your choice, cut 4 pieces 17 bars by 17 bars (front, back, 2 center earring storage “pages”); cut 1 piece 7 bars by 17 bars (side or "book spine"); cut 1 piece 5 bars by 19 bars (strap); cut 1 piece 5 bars by 11 bars (clasp). With yarn and the stitch pattern of you choice, decorate the front and back pieces and overcast 3 edges of each piece. Overcast and join front piece to side piece. Overcast and join back piece to side piece. On both “page” pieces, overcast 3 edges. Attach “page” pieces to the side piece, 3 bars in from edge. Decorate clasp piece in pattern of your choice – center lengthwise along front edge of front piece and stitch short ends to secure. Decorate strap piece in pattern of your choice and overcast edges. Align strap with clasp and stitch to back. Place pierced earrings through the holes in the “pages”.
This pattern is copyrighted and printed with permission and may be used for your personal use only. It may not be copied or reproduced in any form, sold, or copied or posted to another web site. Fiber Images™ accepts no responsibility for the accuracy or correctness of any free patterns listed on this page.
CD Holder(holds 5 CD’s in plastic cases)
Out of standard 7 bars per inch plastic canvas in the color of your choice, cut 2 pieces 35 bars by 35 bars (front and back pieces). Cut 3 pieces 35 bars by 15 bars (sides and bottom). With yarn, overcast and join side pieces edges to front and back edges, then bottom piece to pieces just finished. To hold more or less disks, cut the sides and bottom pieces wider or narrower. Optional: Decorate with stitch pattern desired.
This pattern is copyrighted and printed with permission and may be used for your personal use only. It may not be copied or reproduced in any form, sold, or copied or posted to another web site. Fiber Images™ accepts no responsibility for the accuracy or correctness of any free patterns listed on this page.
Checkbook Cover
Out of standard 7 bars per inch plastic canvas in the color of your choice, cut 2 pieces 23 bars by 46 bars (front, back); cut 1 piece 5 bars by 46 bars (side); cut 2 pieces 19 bars by 46 bars (flap pieces); cut 1 piece 5 bars by 19 bars (strap); cut 1 piece 5 bars by 11 bars (clasp). With yarn and the stitch pattern of you choice, decorate the front, back, and side pieces. Overcast and join front piece to side piece. Overcast and join back piece to side piece. Decorate clasp piece in pattern of your choice – center lengthwise along front edge of front piece and stitch short ends to secure. Decorate strap piece in pattern of your choice and overcast edges. Align strap with clasp and stitch to back. Align one flap pieces along the outer edge of front and align one flap piece along the outer edge of the back. Overcast and join around entire piece. Optional: cut 1 piece 8 bars by 8 bars and join to the inside side piece for a pen holder. Place check register under one flap and place checkbook under other flap.
This pattern is copyrighted and printed with permission and may be used for your personal use only. It may not be copied or reproduced in any form, sold, or copied or posted to another web site. Fiber Images™ accepts no responsibility for the accuracy or correctness of any free patterns listed on this page.
Coasters
Out of standard 7 bars per inch plastic canvas in the color of your choice, cut 2 pieces 20 bars by 20 bars (front and back pieces). With yarn, work the stitch pattern of your choice on one piece, do not overcast the edges. Place two pieces wrong sides together, with yarn overcast and join front and back pieces. For larger or small coasters, cut the plastic canvas pieces larger or smaller.
This pattern is copyrighted and printed with permission and may be used for your personal use only. It may not be copied or reproduced in any form, sold, or copied or posted to another web site. Fiber Images™ accepts no responsibility for the accuracy or correctness of any free patterns listed on this page.
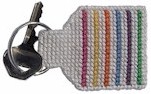
Key Ring
Materials:
![]() 10 mesh plastic canvas
10 mesh plastic canvas
![]() 6-strand embroidery floss: green, purple, blue, orange, yellow, rose, and white
6-strand embroidery floss: green, purple, blue, orange, yellow, rose, and white
![]() 1 1/4” split ring
1 1/4” split ring
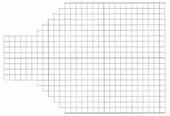
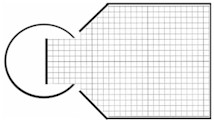
1. Cut 2 pieces of plastic canvas according to the drawing to the right.
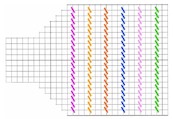
2. Using the continental stitch fill in the 2 plastic canvas pieces according to the chart to the right. Using the continental stitch fill in the remainder of each piece with white embroidery floss.
3. Place the 2 pieces wrong sides together. Place the split ring between the top of the pieces. Using the overcast stitch, attach the two pieces together along the top edge.
4. Using the whipstitch join the 2 pieces together along the angles edge, the sides, and the bottom.
5. Attach keys to the split ring.
This pattern is copyrighted and printed with permission and may be used for your personal use only. It may not be copied or reproduced in any form, sold, or copied or posted to another web site. Fiber Images™ accepts no responsibility for the accuracy or correctness of any free patterns listed on this page.
Potpourri or Moth Ball Holder
Out of standard 7 bars per inch plastic canvas in the color of your choice, cut 6 pieces 19 bars by 19 bars (4 for sides, 2 for ends). With yarn, overcast one edge of side piece. Overcast and join the worked piece to another side piece edge. Overcast and join the worked piece to another side piece edge. Over cast and join the worked piece to last side piece edge. Overcast the last unfinished edge of the worked piece. Place the long worked piece around one end piece and overcast and join edges together work again on other end piece. Squeeze ends together to open and drop in potpourri or moth balls through the opening. To hang, thread ribbon or yarn through the center of opening, make a loop and knot. Optional: decorate bottom two sides with stitch pattern of your choice.
This pattern is copyrighted and printed with permission and may be used for your personal use only. It may not be copied or reproduced in any form, sold, or copied or posted to another web site. Fiber Images™ accepts no responsibility for the accuracy or correctness of any free patterns listed on this page.